

Sale and Coupon Manager
Overview and Basic Sale Setup
Overview
The MightyMerchant Sale and Coupon Manager allows you to set multiple promotional offers and apply them to individual products, all products in a category, or to your entire site.
Before publicizing any discount offer to your customers, YOU MUST first set up and test your sale in the site manager. You may have an idea of a discount or special offer that you want to give your customers that is actually not possible to offer on your web site. You may need to change your offer based on the capabilities of your web site!
The Sale and Coupon Manager provides you with many different options for your promotions. You can
- Offer a percentage off or dollar amount of any selection of products
- Require a coupon code to trigger a discount
- Set timed sales that begin and end on a specific date
- Set single-use coupon codes that only allow each shopper to use the coupon code once
- Apply discounts to shipping charges, including only applying the discount to certain shipping methods
- Set minimum order requirements (quantities or total price) to trigger the discount
- and more...
Setting Up a New Sale or Coupon
The Sale and Coupon Manager allows you to set up sales on a per-item, per-category, or site-wide basis. Sales can either have a coupon code attached to them, which the user will need to enter during the checkout process, or they can apply automatically to the price of an item or group of items.
-
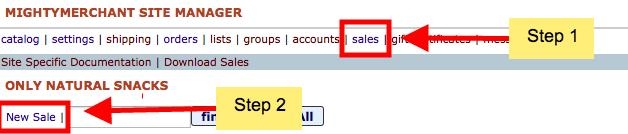
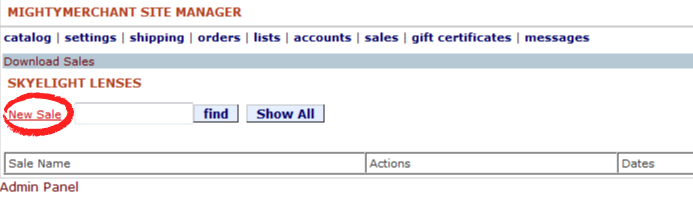
Click the "sales" link at the top of the Site Manager, then click "New Sale"
-
Fill out the fields on the entry screen. All fields are described in more detail below in the "
Definition of Sale and Coupon Manager Fields" section.
-
Consider some of the important options you have when setting up a sale.
When you set up a sale, there are some decisions you will want to make.
- Will this sale apply to more than one item?
If you are only marking down one item and do not want to set a coupon code, you don't need to use the Sale and Coupon Manager. Please view our instructions below on Marking Down the Price of an Individual Item.
- Do you want this sale to discount items or shipping?
The Sale and Coupon Manager can be used to either discount the price of products, or to offer shipping deals, such as free shipping. If you want your sale to offer a shipping discount, please follow the instructions for Setting Up a Sitewide Shipping Sale in the Setting Up Specific Sales section below.
-
Is this sale going to have a coupon?
If you enter a coupon code on the Edit Sale screen, then a user will need to enter a coupon code in order to use this sale.
-
Is this sale going to be store-wide or apply to individual items?
If you would like the sale to apply to everything on your site, you would select "This promotion applies to every product on the site". If you are going to focus this sale on individual items or groups of items, you would select "This promotion applies to specified products only".
Please note: Shipping sales are applied every product on the site. If you want to offer shipping discounts for individual items, you should set the per-product shipping charge on the Edit Product page for the individual product.
For detailed instructions on how to do this, please visit our documentation on Setting Per Product Shipping Charges. -
Do you want the user to be able to use the coupon on multiple trips to your site or only once?
If you designate a single-use coupon by selecting "Each customer can only use this coupon once" then MightyMerchant will use various criteria to try to prevent the same person from using the same coupon a second time.
-
Do you want the sale to apply to the total order price or do you want the discount to apply to the price of each sale item that the user orders?
This option requires a little additional explanation:
- The impact of this choice depends on whether you specify a sale that is based on a dollar amount or a percentage.
- If you choose a dollar discount, the choice of "Apply a discount to the total order price" will have a dramatic impact on the value of the sale.
- If you choose a percent discount then there really will not be an impact on the order total if the "Apply a discount to the total order price" feature is checked.
-
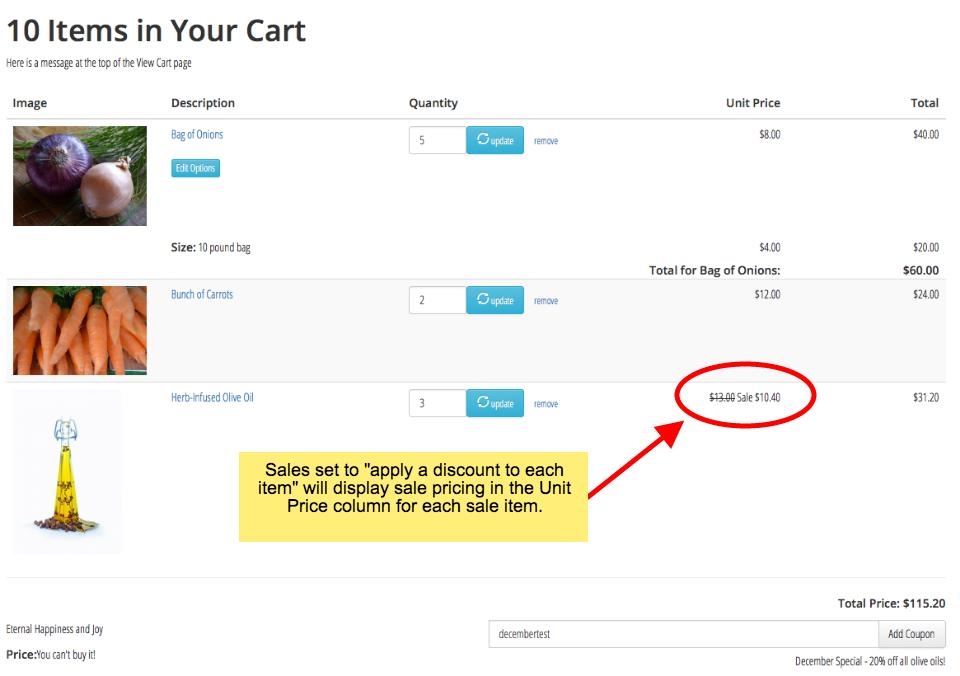
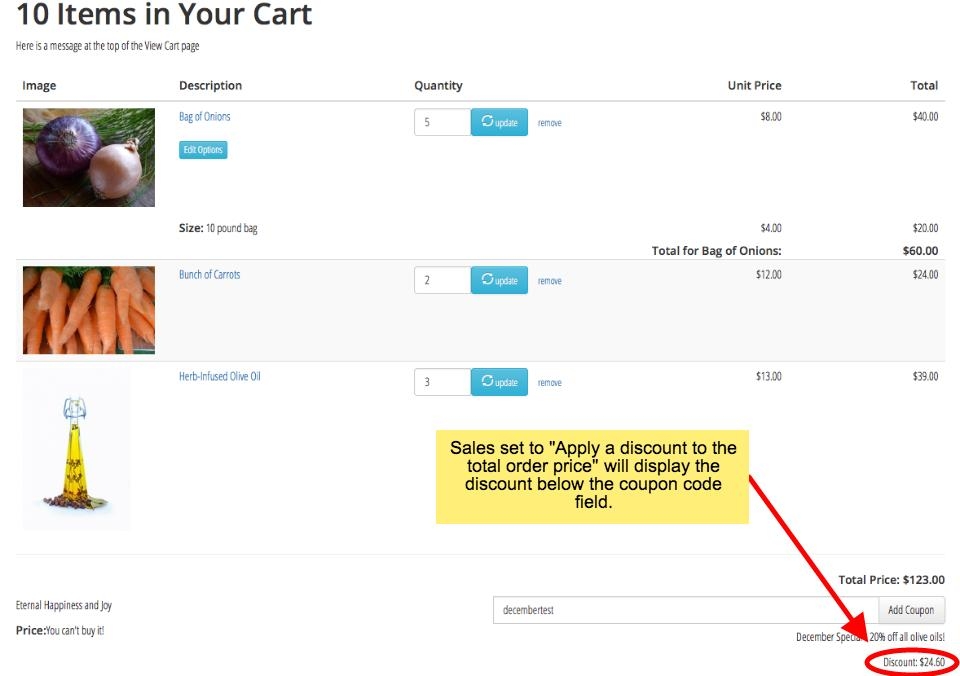
Regardless of whether you have a percentage-off or dollar-off sale, there is always going to be one key impact of your choice. If you select "Apply a discount to the total order price" the sale will only be reflected on the total for the order. If you select "Apply a discount to the price of each item" then the sale will be reflected on each line item of the order. If your intent is for the user to see the discount for each item then you want to select "Apply a discount to the price of each item".
Please note: Shipping sales are applied to the shipping total, not to individual items.
- If you will be running multiple concurrent sales, you likely will not want to select "Apply a discount to the total order price."
- There are other options to select. Most of them are pretty straightforward - like the start date and end date for your sale. We have included a description of all fields on the Edit Sale screen below.
- Will this sale apply to more than one item?
Marking Down the Price of an Individual Item
Just want to mark down one item? If you don't want to set a coupon code for the discount, you don�t need to set up a sale in the Sale and Coupon Manager � you only need to edit the item and set a sale price. These are the steps you would take:
- Navigate to the edit item screen for the item you would like to mark down.
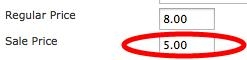
- Enter a number in the sale price field. As long as this number is lower than the regular price, the markdown will display on your site.
- Click the �Save Changes� button.
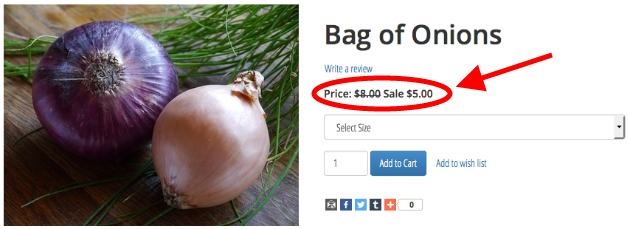
- Preview the item to make sure that your sale price is showing correctly.
Once you are ready to remove the markdown, use the following steps:
- Navigate to the edit item screen for that item.
- Delete the sale price from the sale price field, and enter 0.00
- Click the �Save Changes� button.
- Preview the item to make sure that the markdown is no longer displaying.
Definition of Sale and Coupon Manager Fields
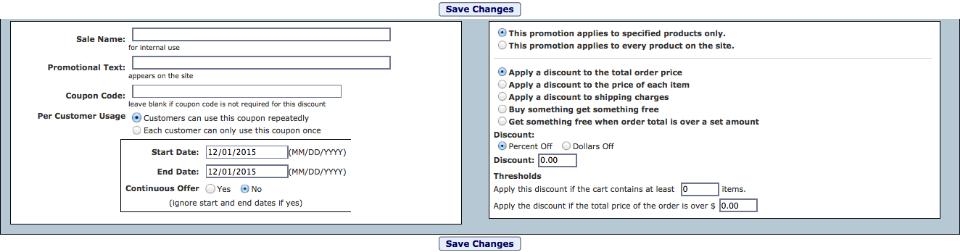
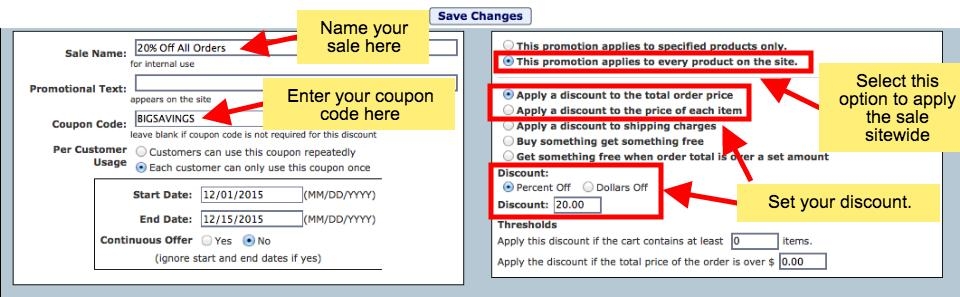
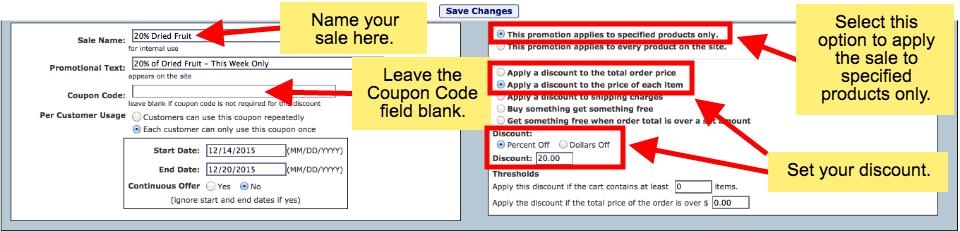
Sale Name: The name of your sale. Primarily for internal use
Promo Text: A short tag line related to the sale. This is displayed with any product that has a sale applied, whether or not the sale is triggered (in other words, if the sale requires a coupon code, the promo text will display whether or not the coupon code has been entered).
Coupon Code: If you enter a code then that code will be required in order for a customer to use this sale.
Per Customer Usage: If you select "Customers can only use this coupon once", MightyMerchant will use various criteria to prevent the same person from using the coupon more than once.
Start Date: The date for your sale to start.
End Date:The end date for the sale.
The simplest way to deactivate a sale is to set both the Start Date and the End Date to a date before today.
Continuous Offer: Select "Yes" if you want to ignore the expiration date for the sale.
This promotion applies to every product on your site: Select this option to create a site-wide sale.
Reminder: If you are creating a sitewide sale, you will likely want to enter Start and End Dates, and set "Continuous Offer" to "No."
This promotion applies to specified products only: Select this option if you only want your sale to apply to a specific item or items of your choosing.
Please note: If you select this option, you will need to assign your sale to those items following the steps in the Assigning a Sale section below.
Apply a discount to the total order price: If you select this option, for any items included in this sale, the sale will only apply once to the order total no matter how many sale items a customer purchases.
If you will be running multiple concurrent sales, you likely will not want to select this option.
Apply a discount to the price of each item: If you select this option, the sale will be applied line-by-line to each sale item.
Apply a discount to shipping charges: Select this option if you would like your sale to apply to shipping charges rather than to items purchased. Once you have selected this option, you will see a new box appear on the edit sale screen where you will be able to check off shipping methods you would like the sale to apply to.
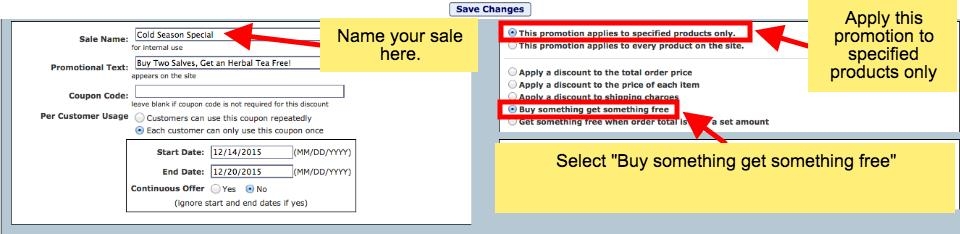
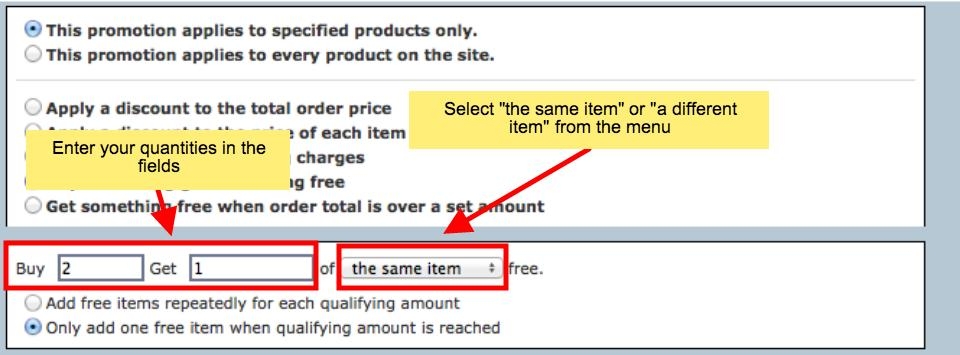
Buy Something Get Something Free Sale: When you select this type of sale, you will be able to choose whether you are offering the same item free, or a different item free (buy "x," get another "x" free, or buy "x," get "y" free). You will also be able to enter a quantity for the items (buy 3 "x," get 1 "x" free, or buy 10 "x" get two "y" free).
If you select to offer a different item free, a field will appear where you can enter the name of your free product. Once you begin typing, the field will offer you some autocomplete options. Make sure that the name you enter is the exact name of the product you want to offer for free.
As a final variation to this sale, you are also able to choose whether the sale will add free items repeatedly for each qualifying amount, or only add one free item when the qualifying amount is reached. Here is an example of how this sale will work if you select to add free items repeatedly:
Original sale -- buy 2 "x" get 1 "y" free.
If the customer buys 4 "x," they will get 2 "y" free.
If the customer buys 6 "x," they will get 3 "y" free... etc.
Get something free when order total is over a set amount: When the customer spends an amount, "A," they will get "B" number of product "C." You can specify "A," "B" and "C."
Here is an example of what would happen if you ran multiple sales of this type at the same time:
Sale 1: Spend $50, receive one free T-shirt.
Sale 2: Spend $100, receive one free coffee mug.
Because a customer who spends $100 reaches both qualifying amounts, they would receive both a free T-shirt, and a free coffee mug.
Discount: Enter a value and set the type as either "Dollars Off" or "Percent Off"
Thresholds: Fill out either or both fields in the Thresholds section if you would like to limit your sale so that it only applies if the customer meets certain thresholds. You can set either of the following thresholds:
- An item quantity threshold, based on the number of items the customer has in their cart
- A total order price threshold, based on the total price of the customer's order
Assigning Your Sale
Once you have finished filling in your sale settings in the sale and coupon manager, you will, in most cases, need to take additional steps to assign the sale to the categories or products you would like it to apply to. The process of assigning a sale differs depending on whether you want it to apply on a per-item basis, a per-category basis, or to all of the products on your site.
Please note: If you have NOT entered a coupon code for your sale AND your sale is either set to be a continuous sale OR is set for a time range that includes today's date, your sale will begin displaying on the site as soon as you assign it to categories or items. Please ensure that your sale is set for a future time range and use our instructions below to test your sale before you make it available for the public on your site.
Assigning a Sale to Every Product on the Site
Assigning a site-wide sale is a quick process that can be accomplished through the sale setup screen in your Sale and Coupon Manager.
Reminder: If you do not want your sitewide sale to be immediately active, you will need to set the appropriate Start and End Dates on the Edit Sale screen.
- Click "sales" at the top of your site manager.
- Click "Edit Sale" in the Actions column for the sale you would like to assign.
- Select "This promotion applies to every product on the site."
- Click the "Save Changes" button.
Assigning a Sale on a Per-Category Basis
An individual item may only have one sale assigned to it at a time. This includes sales that are assigned at the category level.
This feature works by going into each individual item in a category, and setting the sale category for that item. You can always use the feature to assign the sale to all items in a category and then edit a few individual items and unset the sale by choosing "Select..." from the Sale Category dropdown menu, if you don�t want those items on sale.
To assign the sale to all of the items in a category:
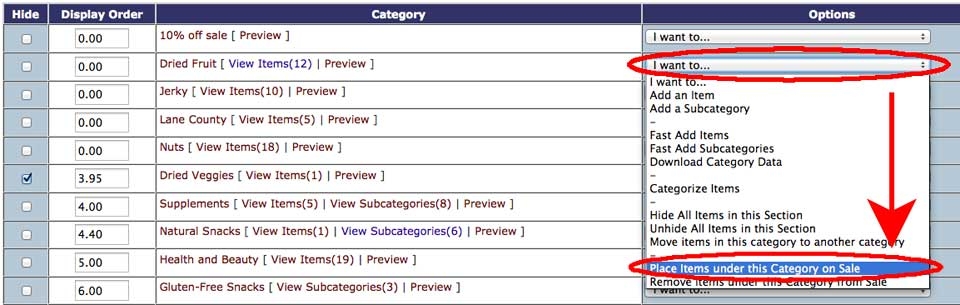
- Navigate so that you are viewing the relevant category in list view.
- Click the "I want to..." menu to the right of the category.
- Choose "Place Items under this Category on Sale"
 You will be taken to a screen that displays all of your active sales.
- Click the "Apply Sale" button to the right of the sale you would like to apply.

-
You can verify that you have placed the items on sale using the following steps:
- Navigate to the "sales" page
- Click "View Sale Items".

You will see a list of all the items with this sale currently assigned to them. - If desired, repeat steps 1-5 as necessary to assign the sale to additional categories
- Test your sale! You are not done until you have verified that the settings you entered are giving you the results you want.
Assigning a Sale on a Per-Item Basis
An individual item may only have one sale assigned to it at a time. This includes sales that are assigned at the category level.
To assign your sale to a specific item:
- Navigate to that item in your product catalog.
- Click the "Edit" link on the left-hand side of the row for that item.
- Click the "Sale Category" dropdown menu
- Select the sale you would like to apply from the menu.
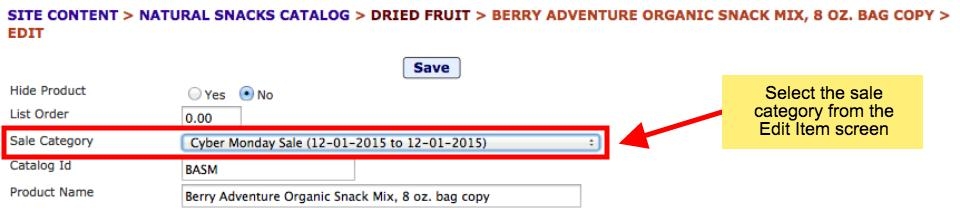
- Click the "Save" button.
- If desired, repeat steps 1-5 to assign the sale to additional items.
- Test your sale! You are not done until you have verified that the settings you entered are giving you the results you want.
Viewing Sale Details
Your sales area will display all sales and coupons that are currently active. To
view all sales, including expired sales and sales set for future dates, click the "Show All" button.
An active sale is a sale that is currently available for customers to use on the site. If your sale is not set to be a Continuous Sale, and has dates set for the future or the past, it is not active and will only show in your list of sales if you click "Show All."
You are now viewing all sales and/or coupons that have been used in your store. From this screen you can choose from several options, depending on what you seek to do.
- To modify a previously created sale, click "Edit Sale"
- To see which items were affected by a sale, click "View Sale Items"
- To see usage statistics for a specific sale, click "View Usage"
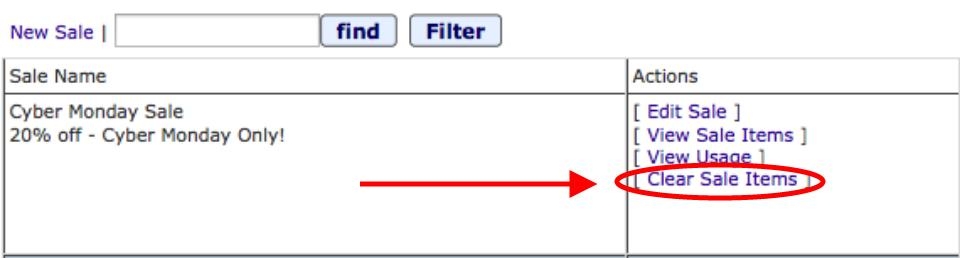
- You can also clear the list of items that the sale applies to, by clicking "Clear Sale Items"
Testing Your Sale
Testing your sales before you make them available to the public is an essential step that allows you to determine if your promotion will work as expected! Here are our recommended steps for testing a sale:
- Edit your sale.
- Enter a temporary coupon code for the sale that only you know.
You should enter a coupon code at this stage even if your sale will not require one. Using a temporary coupon code allows you to test your sale without it displaying for your customers on your site.
- Set "Continuous Offer" to "Yes" so the sale will be active.
- Make sure that you have assigned your sale to the appropriate items and/or categories using the instructions for Assigning Your Sale above.
- On the user side of your site, add a mixture of sale and non-sale items to the cart.
- View your cart.
- Enter your temporary coupon code in the Coupon Code Field, and click "Add Coupon."
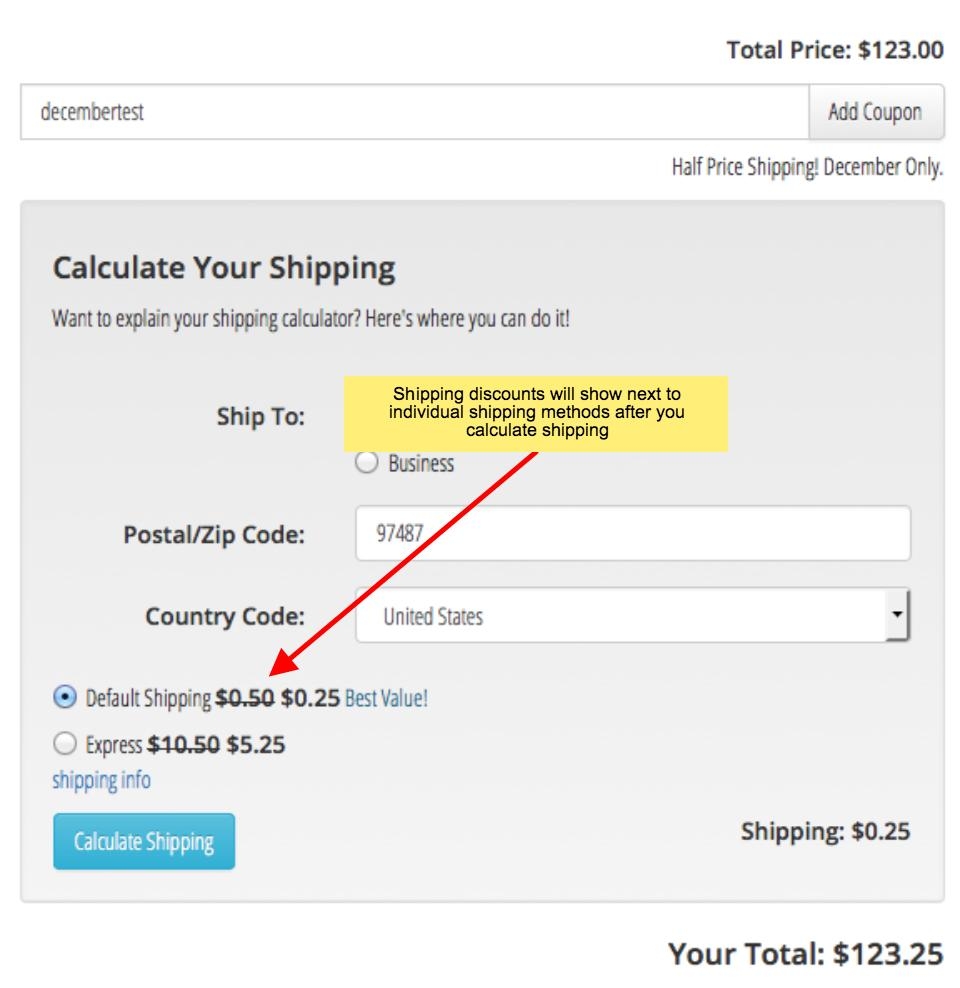
- Confirm that your discount is now showing (it should show on the View Cart page where you have entered your coupon). Depending on how you have set your sale up, your discount will show in different areas of the page:
- Once you have confirmed that the discount is calculating as you would expect, you will want to take the following steps to adjust your sale settings so that they are correct when you make the sale public:
- Edit the sale.
- Set "Continuous Sale" to "no"
If the sale will be a continuous sale, you will want to change this setting again when you are ready to make the sale available to the public.
- Change the coupon code to the actual code customers will be using, or remove it, if the sale will not require a coupon code.
- Click "Save Changes" to save your sale.
At this point, your sale should be applied to the ACTUAL items that will be on sale. However, if these items are currently on a different sale, the discount may not calculate correctly. As an alternative if you need to avoid overlapping sales, we suggest that you create hidden test items on your site and apply the new sale to them to test.
Removing Items from a Sale
Removing items from a sale can be accomplished quickly and easily. The steps you take will differ depending on whether you would like to remove all the items from a sale, or if you would like to remove a category of items from a sale.
If your intent is to deactivate a sale to use at a later time, you do not need to remove the items from that sale. Deactivation can be accomplished by setting the Start and End Dates to dates before today. Start and End Dates can be edited from the Edit Sale screen.
Removing All Items from a Sale
-
Click the "sales" link at the top of the Site Manager.

- Click the "Clear Sale Items" link in the Actions column for the appropriate sale.
Removing a Category of Items from a Sale
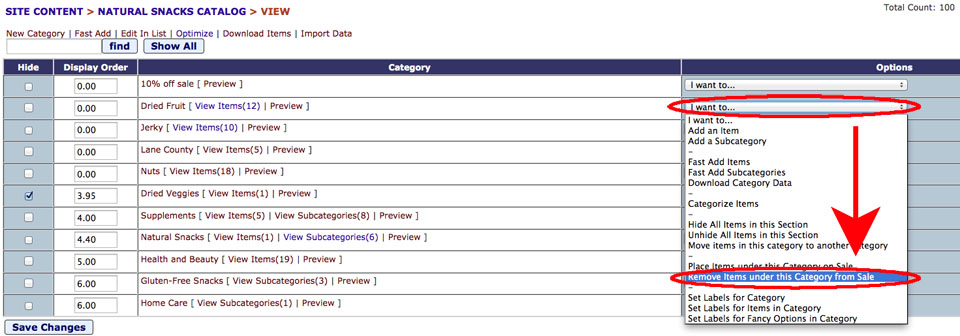
- Navigate so that you are viewing the relevant category in list view.
- Click the "I want to..." menu
- Select "Remove Items under this Category from Sale" in the dropdown menu.
Setting Up Specific Sales
MightyMerchant is designed to help you create sales for your site in a very intuitive, easy-to-understand way. Here, we'll go over how you can set up several types of common sales.
Setting Up a Sitewide Sale with a Coupon
- Use our instructions above for Setting Up a New Sale or Coupon to create your sale.
- Add in the parameters of your sale.
- Set a sale name
- Enter a Coupon Code that customers will use to trigger the discount. Coupon codes are not case sensitive.
- If applicable, set a Start Date and an End Date for the sale. Otherwise, set "Continuous Offer" to "Yes."
- Select "This promotion applies to every product on the site."
- Select the type of discount you want to give during the sale.
- Enter any additional parameters you would like to use.
- Click the "Save Changes" button to save your sale.
- Test your sale! You are not done until you have verified that the settings you entered are giving you the results you want. You can test your sale by following the steps for "Testing a Sale with a Coupon Code" in the Testing Your Sale section above.
Setting Up a Sale for One Category with No Coupon Code
Step One: Create the Sale
- Use our instructions above for Setting Up a New Sale or Coupon to create your sale.
- Next, you want to add in the parameters of your sale:
- Set a sale name
- Leave the "Coupon Code" field blank.
- If applicable, set a Start Date and an End Date for the sale. Otherwise, set "Continuous Offer" to "Yes."
- Select "This promotion applies to specified products only"
- Select the type of discount you want to give during the sale.
- Enter any additional parameters you would like to use.
Step Two: Add the Category to the Sale
- Navigate so that you are viewing the relevant category in list view.
- Click the "I want to..." menu to the right of the category.
- Choose "Place Items under this Category on Sale"
You will be taken to a screen that displays all of your active sales.
- Click the "Apply Sale" button to the right of the sale you would like to apply.
-
You can verify that you have placed the items on sale using the following steps:
- Navigate to the "sales" page
- Click "View Sale Items".
You will see a list of all the items with this sale currently assigned to them.
- Test your sale! You are not done until you have verified that the settings you entered are giving you the results you want. You can test your sale using the steps for Testing a Sale with No Coupon Code in our Testing Your Sale section above.
Setting Up a BOGO or Free Bonus Item Sale
Step One: Create the Sale
- Use our instructions above for Setting Up a New Sale or Coupon to create your sale.
- Next, you want to add in the parameters of your sale:
- Set a sale name
- Select "This promotion applies to specified products only"
- If applicable, set a Start Date and an End Date for the sale. Otherwise, set "Continuous Offer" to "Yes."
- Select "Buy something get something free"
- Use the dropdown menu to select either "the same item" or "a different item," depending on whether the customer will receive the same item, or a different item free when they qualify for the sale.
-
If you select to offer a different item free, a field will appear where
you can enter the name of your free product. Once you begin typing, the
field will offer you some autocomplete options. Make sure that the name
you enter is the exact name of the product you want to offer for free.

-
Choose whether
the sale will add free items repeatedly for each qualifying amount, or
only add one free item when the qualifying amount is reached. Here is an
example of how this sale will work if you select to add free items
repeatedly:
Original sale -- buy 2 "x" get 1 "y" free.
If the customer buys 4 "x," they will get 2 "y" free.
If the customer buys 6 "x," they will get 3 "y" free... etc.
- Enter any additional parameters you would like to use.
- Click the "Save Changes" button
Step Two: Assign the Sale to an Item
You will now need to assign the sale to the item the customer has to buy in order to receive the free item. You do not need to assign the sale to the free item, because you have specified the free item when you set up the sale.
- Navigate to the item in your product catalog.
- Click the "Edit" link on the left-hand side of the row for that item.
- Click the "Sale Category" dropdown menu
- Select the sale you would like to apply from the menu.
- Click the "Save" button.
The sale should now be assigned to this product! You may now begin testing your sale.
Step Three: Test Your Sale
Test your sale! You are not done until you have verified that the settings you entered are giving you the results you want. To test your sale, use our instructions in the Testing Your Sale section above.
Offer Deep Discounts with a Double Markdown

In some cases, you may want to display a double markdown for a product to indicate that its price has been reduced twice. You can create a double markdown by using a combination of the sale price field and a sale you have created in the sale and coupon manager. These are the steps you would take:
- Follow our instructions for Marking Down the Price of an Individual Item to apply your first markdown.
- Use the appropriate instructions for setting up a sale to create your second discount in the sale manager, and apply the sale to your item using our instructions for Assigning a Sale on a Per-Item Basis. Please note, if you want the double markdown to display for all site visitors, you will likely not want to set a coupon code for the sale.

- Test your sale! You are not done until you have verified that the settings you entered are giving you the results you want. To test your sale, use our instructions in the Testing Your Sale section above.
Setting Up a Sitewide Shipping Sale
If you want to offer limited time free or discounted shipping for all your products, or for orders above a specific order total, a shipping sale is the way to go.
Please note: Shipping sales are applied every product on the site. If you want to offer shipping discounts for individual items, you should use the per-product shipping charge type.
For detailed instructions on how to do this, please visit our documentation on
Setting Per Product Shipping Charges.
Step One: Create Your Sale
- Log in to your MightyMerchant site manager and click on the "Sales" option at the top of the page.

- Click "New Sale" to the left of the search bar.
- Next, you want to add in the parameters of your sale:
- Set a sale name
- If applicable, set a Start Date and an End Date for the sale. Otherwise, set "Continuous Offer" to "Yes."
- Select "This promotion applies to every product on the site."
- Select "Apply a discount to shipping charges"
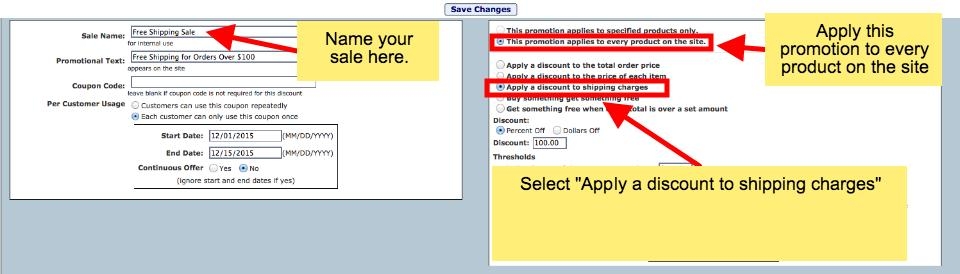
- Select "Percent Off" or "Dollars Off"
- Enter the discount amount in the Discount field (Free Shipping would be 100.00 percent off)
- Enter any desired Thresholds
- Check off the shipping methods you would like your shipping discount to apply to in the box at the bottom right-hand corner of the Edit Sale page (this box will not display until you have selected "Apply a discount to shipping charges").

- Enter any additional parameters you would like to use.
- Click the "Save Changes" button
- Congratulations! Your sale is now ready to test.
Step Two: Test Your Sale
Test your sale! You are not done until you have verified that the settings you entered are giving you the results you want. To test your sale, use our instructions in the Testing Your Sale section above.
Running Multiple Sales Concurrently
You can have many sales running concurrently. Here are a few things to keep in mind when doing so.
- Having multiple sales or coupons with each geared toward specific products or groups of products is the intended use of this feature.
- It would not make sense to have multiple sitewide sales running at once.
- You can have multiple site-wide coupons going at the same time. The coupon code that the customer enters would trigger the appropriate sale.
- An item may only have one sale assigned to it at a time.
Publicizing Your Sale
MightyMerchant offers several built-in ways to publicize your sale on your site:
- Using the promotional text, editable from the Edit Sale screen.
- Using a sitewide message, typically editable through your MightyMerchant messages manager
You may also want to do the following to publicize your sale:
- Publicize your sale through social media channels.
- Send out an email marketing blast to announce your sale.
- Create a slide with a sale announcement and add it to your homepage slideshow.