

Setting Up Option-Based Pricing
Overview
Option-Based Pricing allows you to define pricing based on a range of characteristics of a product and the options chosen.
Option Pricing can all be used to
- Create one or more groups of product options
- Create quantity pricing (different pricing depending on quantity ordered)
- Create dependent pricing options (a secondary group of options is dependent on a first group of options)
- Create packages consisting of various products
- Create pricing models that can be shared across multiple products
Depending on how you set up your options, they will display on your product pages as
- Product options in a drop-down menu
- Supplementary product photos
- Both drop-down menu choices and supplementary product photos
Understanding Price and Price Option
When setting up pricing options, it's important to understand how the Price and Price Option settings work together. In a nutshell, how the price for an option gets added to the cart will depend on both the price and the price option.
Base Price Option
- The base price for the product when that option is chosen.
- Overrides any original price (e.g., if you have a price entered in the main product price field).
- IMPORTANT: Do not select a Price Option of "base" if the price of the option is $0.
Surcharge
- The option price entered gets added to the base price
Dollar off base price
- Theoretically this Price Option will work, but it will also cause formatting issues, so we do not recommend using it.
- The best way to subtract an amount from your base price is to enter the amount in the 'Price' column as a negative amount (i.e. -$1.00) and use the Add On/Surcharge -$ Price Option. This will work and your formatting will be correct.
Percent off base price
- Subtracts a percentage from the base price
One-Time Charge
- This charge is added to the base price only once, no matter the quantity of the product ordered
- This is often used for set up fees.
Creating Product Option Groups
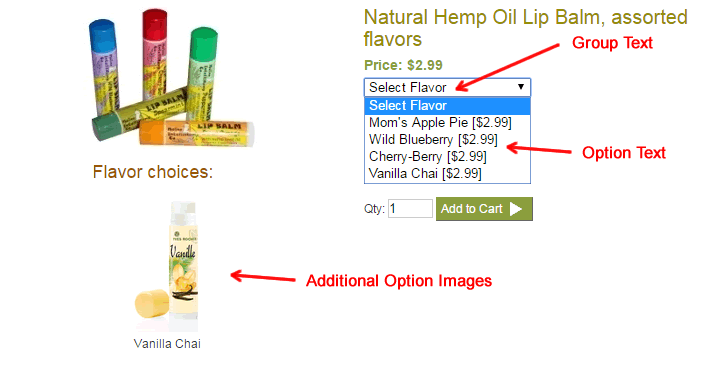
Example 1: Setting up a product with one group of options
Let's say you have a "Lip Balm" product that comes in four flavors.
This is how the product detail will display after setting up your options
Here is how you would create the options for this item.
1. In your Site Manager, edit the item, then scroll down to view the option grid
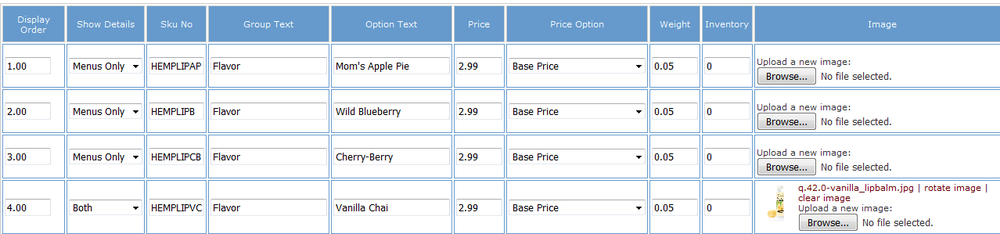
2. Enter the Group Text
- This is the label for the drop-down option menu and should be the same for each option.
3. Enter the Option Text
- This is the name of each individual option within a group.
4. Enter the Price and Select the Price Option
- With one group of options you'll most likely set this to "base"
5. Upload Option Images (optional)
6. Set the "Show Details" menu
- Menus Only: Displays the option only in the drop-down menu
- Details Only: Option is an additional product image and has no affect on the price
- Both: Displays the option in the drop-down menu and displays the option image as an additional product image.
7. Enter any other information, such as display order, sku number, weight, and inventory, as needed.
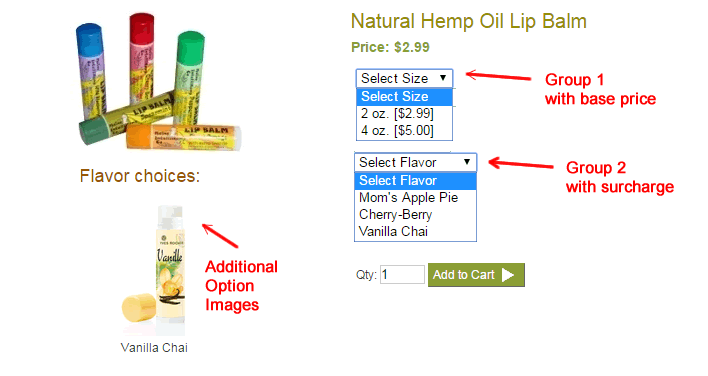
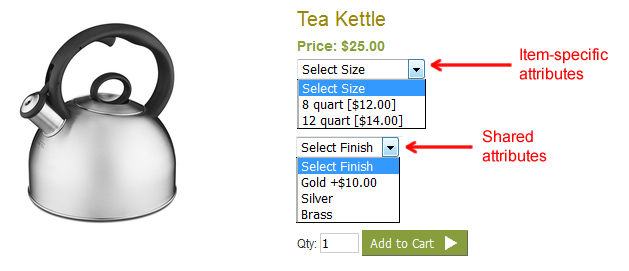
Example 2: Setting up a product with multiple groups of options
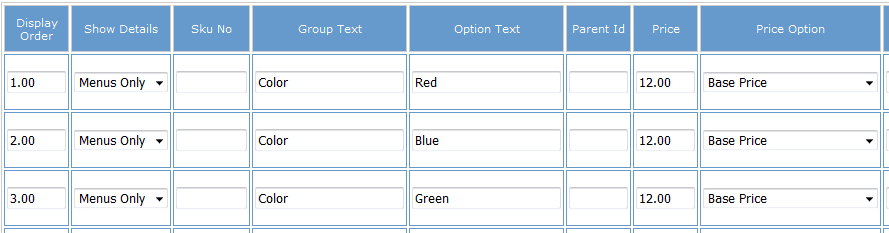
In this example, you have a lip balm product that is available in two sizes and three colors.
This is how the product detail will display after setting up your options
Here is how you would create the options for this item.
1. In your Site Manager, edit the item, then scroll down to view the option grid
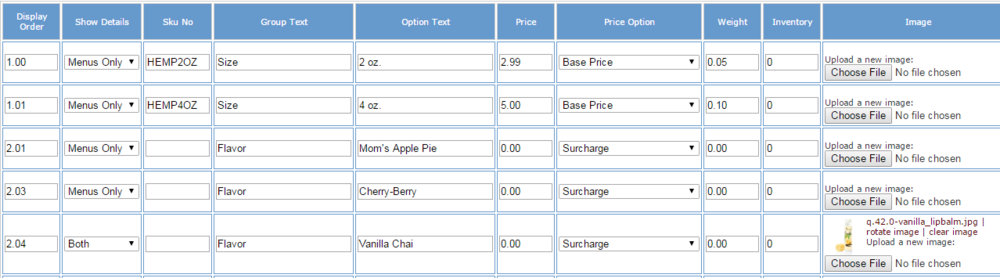
2. Enter the Group Text for Each Group Type
- This is the label for the drop-down option menu and should be the same for each option.
3. Enter the Option Text
- This is the name of each individual option within a group.
4. Enter the Price and Select the Price Option
- Set one group of options to "base". Only one group can be set to "base".
- Additional groups will usually be set to "surcharge", but in some instances you may want to choose percentage/dollar off base price, or one-time charge.
- If you enter a price on an option set to a price option other than "base", that amount will be added to the "base" price.
5. Upload Option Images (optional)
6. Set the "Show Details" menu
- Menus Only: Displays the option only in the drop-down menu
- Details Only: Option is an additional product image and has no affect on the price
- Both: Displays the option in the drop-down menu and displays the option image as an additional product image.
7. Enter any other information, such as display order, sku number, weight, and inventory, as needed.
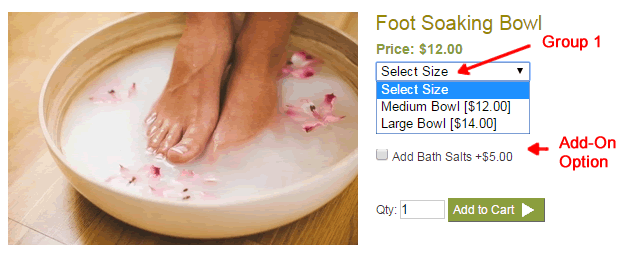
Example 3: Creating an Add-On Option
In this example, you offer a foot spa that comes in two sizes and can be purchased with an optional package of bath salts.
This is how the product detail will display after setting up your options
Here is how you would create the options for this item.
1. In your Site Manager, edit the item, then scroll down to view the option grid
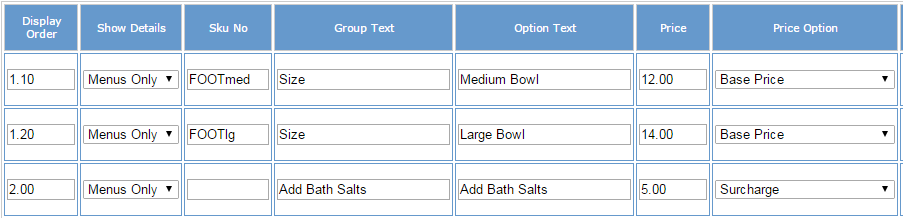
2. Enter the Group Text for Each Group Type
- This is the label for the drop-down option menu and should be the same for each option.
- Optional groups willl only have one item in the group.
- Optional groups will dislay as a checkbox and will not display the Group Text.
3. Enter the Option Text
- This is the name of each individual option within a group.
- Your add-on option should have option text that will make it clear the item is an add-on.
4. Enter the Price and Select the Price Option
- Set one group of options to "base". Only one group can be set to "base".
- Additional groups will usually be set to "surcharge", but in some instances you may want to choose percentage/dollar off base price, or one-time charge.
- If you enter a price on an option set to a price option other than "base", that amount will be added to the "base" price.
5. Upload Option Images (optional)
6. Set the "Show Details" menu
- Menus Only: Displays the option only in the drop-down menu
- Details Only: Option is an additional product image and has no affect on the price
- Both: Displays the option in the drop-down menu and displays the option image as an additional product image.
7. Enter any other information, such as display order, sku number, weight, and inventory, as needed.
Tip: Use a combination of the above examples to create product packages.
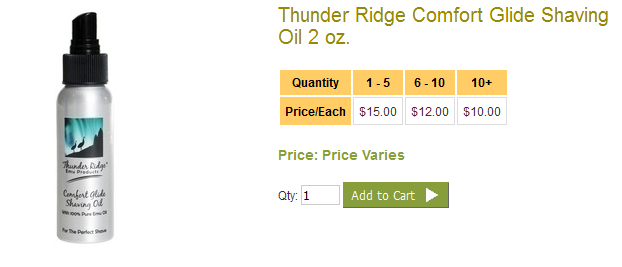
Setting Up Quantity Pricing
Quantity pricing allows for price breaks when certain quantities of an item are purchased. Quantity pricing may be added to any option.
Note: Not all sites will have the quantity option field active. If you have the need for quantity pricing and do not have these fields active, contact HEROweb.
How quantity pricing displays on the product detail page
How quantity pricing is set up in the Site Manager
1. In your Site Manager, edit the item, then scroll to the options grid
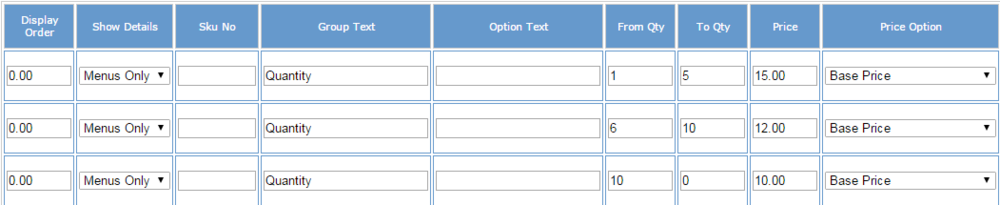
2. Enter quantities in the "From Qty" and "To Qty" fields
- The first "From Qty" field must start with the number 1, even if you have a higher minimum quantity set for the item.
- Notice that you have to repeat each option for as many price breaks as you are offering.
- Enter 0 in the final "To Qty" field. This means "any higher quantity".
- If you have other options, such as different colors, the Price Option must be set to 'Add-on/Surcharge $'
- You can modify/style the Quantity Option table by creating a custom qty_price_list.html in your local products/[my special layout] directory
- If you want to use the custom qty_price_list.html you must change the price list tag, from PRICLIST2 to PRICELIST (surrounded by curly braces).
Setting up Dependent Options
If you have some options that are only available if the user select another option, for example if certain sizes are only available in certain colors, you can set up dependent options.
Setting up dependent options is a two-step process:
1. First enter the main "Parent" choices and save.
For example:
- This step will usually include your "base" price options
2. Edit the product again, this time adding the "Child" options and designating a "Parent" for each "Child".
For example:

Tip: Give your "child" options a display order with a similar number to the "parent". Then, after you save, the "parent" will be grouped with its "children". For example:
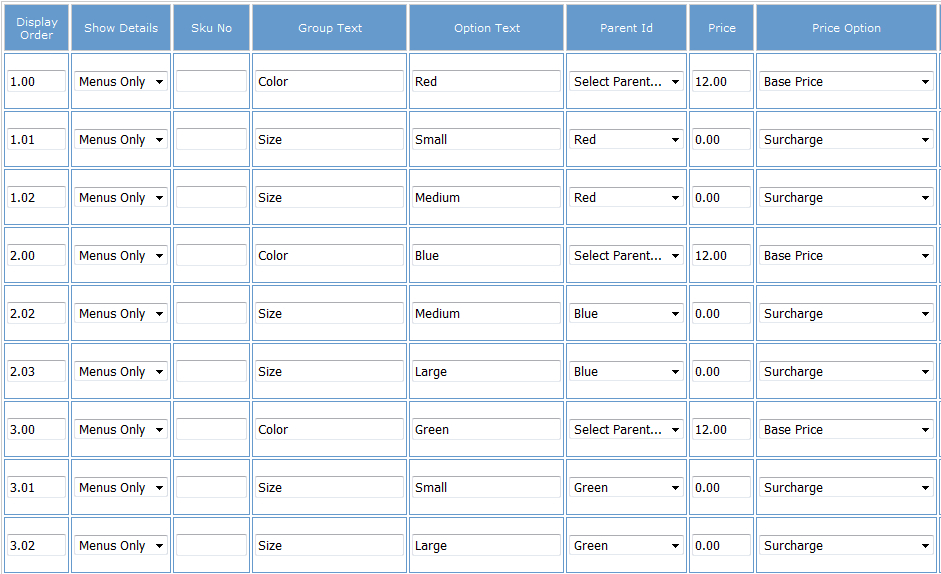
The above settings would make these combinations available to order:
- Red: Small and Medium
- Blue: Medium and Large
- Green: Small and Large
Note: if your site has inventory controls along with dependent choice options, you must enter an inventory quantity on the "Parent" line as well as the individual option line in order for any options for that parent to show on the site.
Setting Up Shared Attributes
If you have pricing or other options that are common to many products, you can "share" these across products. This way, if you ever need to update the pricing or options, you only have to update them in one place.
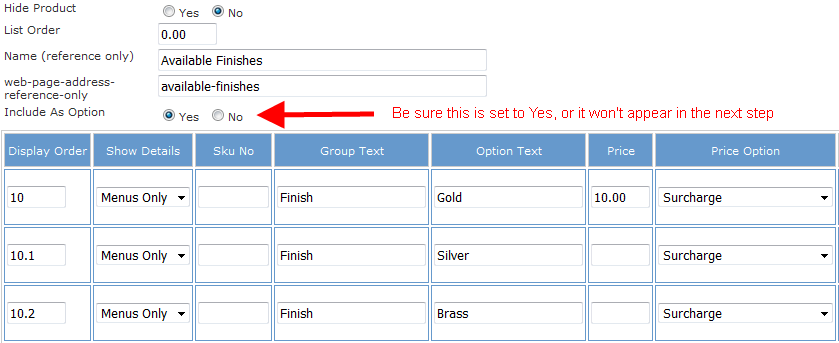
Example: You have several products that come in similar finishes
1. Add an item to your Shared Attributes category.
- Give it a descriptive name you will understand when assigning the options to a product
- Set the "Include as Option" field to Yes
- Fill out the options grid as appropriate
For example:
Tip: If you have separate configurations that are frequently grouped together, you can create separate shared pricing options. For example, using the "finishes" scenario, you could create "Silver Finishes," "Gold Finishes," and "Copper Finishes" by using identical group labels in each option set. When adding a product you just check off which finishes this product comes in.
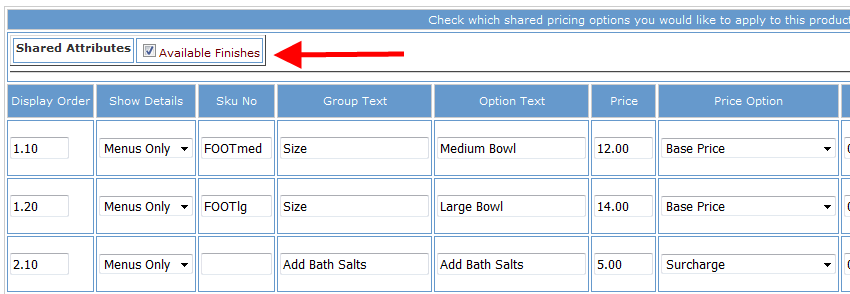
2. Assign the shared attributes to individual products.
- Edit the item that will include the shared attributes, then scroll to just above the options grid. You will see a list of your shared attributes.
- Check off the appropriate shared attributes (you can check off multiple, as needed), then save.
For example:
3. The product will now include any options entered specifically in that product, plus any assigned shared attributes.
Menus Only, Details Only or Both?
The "Show Details" setting affects where options and option images will display on the product detail page.
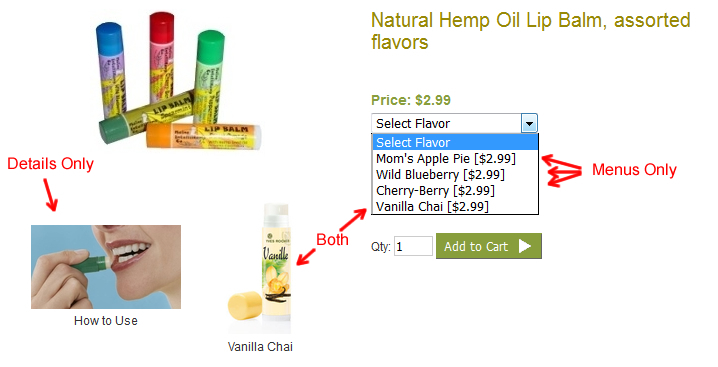
- Menus Only: Displays the option only in the drop-down menu
- Details Only: Option is an additional product image and has no affect on the price
- Both: Displays the option in the drop-down menu and displays the option image as an additional product image.
- Hide: The option will not display at all.
Basic Rules
- The group text is required.
- Items in a group must all share the same "price type".
- Items in the same group must have identical group labels. We recommend using copy and paste to set the group label.
- Only one group can be set as the "base price".
- You never want to have an option set with a Price Option of "base" and a Price of $0.