

Mailing List Opt-Ins
Overview
MightyMerchant allows you to collect email addresses from site visitors who want to opt in to your mailing list. The opt-ins can be saved to a .csv file that can be downloaded from your Site Manager, or can be integrated directly with a number of email marketing providers, including Constant Contact, MailChimp, and Vertical Response.
Site visitors will have the opportunity to opt in in three ways
- Using the mailing list sign up form
- Opting in on the contact form
- Opting in during checkout
If you are integrating with an email marketing service, such as Constant Contact or MailChimp, please refer to instructions for that particular service.
Integrating with Constant Contact
MightyMerchant allows you to save mailing list opt-ins directly to a Constant Contact list.
Step 1: Integrate with Constant Contact
This tutorial assumes you have already created a Constant Contact account.
- Go to https://v3.developer.constantcontact.com/login/index.html.
- Click "Log In".
- Log in with your Constant Contact username and password. (This developer account is your main Constant Contact account.)
- Make sure you are on the "My Applications" tab.
- Click "New Application" in the top-right corner.
- Enter "MightyMerchant" as the application name.
- In the "Application OAuth2 Settings" section, choose the following:
- Authorization Code Flow and Implicit Flow
- Rotating Refresh Tokens
- Click "Create"
- You will now see your application. Click on the application name to view the settings.
Open a new tab and sign in to the MightyMerchant Site Manager
- Go to Settings.
- Click "Edit" next to Optin Provider.
- Select "Constant Contact v3" and click Next.
- Enter your Constant Contact username.
- Copy the API Key from Constant Contact and paste into the "Key" box in MightyMerchant.
- In Constant Contact, click "Generate Secret" and copy the Secret and paste into the "Consumer Secret" box in MightyMerchant.
- In MightyMerchant, copy the Redirect URI that is in bold at the bottom of the box.
- In Constant Contact click the pencil icon next to the Redirect URL and paste what was copied into the input box. Click "Confirm".
- Save your changes in Constant Contact.
- Save your changes in MightyMerchant.
- Click "Link your site to Constant Contact".
- You will be presented with an authorization dialog. Authorize the app.
- You should see a message that you have been successful. If not, contact MightyMerchant support for additional help.
Your site is now ready to send opt-ins directly to your Constant Contact account. You will need to follow the instructions below for Setting Your Opt-in Messaging. Be sure to test and confirm that the sign-ups go into Constant Contact.
List Names
The default list names on the opt-in forms are:
- Web Optins
- Wholesae Web Opt-ins (if wholesale is enabled on your site)
Lists with these names will be automatically created in your Constant Contact account, if they are not already created.
Step 2: Setting Your Opt-in Messaging
Please see our instructions below for information on Adding/Updating Your Opt-In Messaging.
Integrating with MailChimp
MightyMerchant allows you to save mailing list opt-ins directly to a MailChimp list.
Step 1: Integrate with MailChimp
- Log in to your MailChimp account and make sure you have created at least one list.
-
Generate an API key In your MailChimp account.
http://kb.mailchimp.com/accounts/management/about-api-keys - In your Site Manager, click "settings", then edit the Optin Provider field.
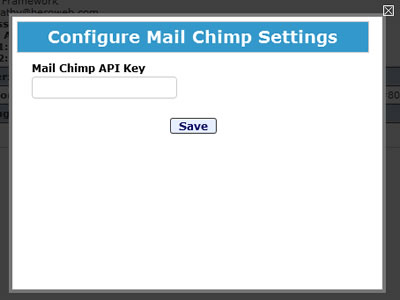
- Select "MailChimp", then "next"
-
Enter the API Key, then Save.
To complete the integration and enable the Opt-In to Mailing List feature on your Checkout pages is as easy as enabling two message fields in your Site Manager.
As usual, log in to your Site Manager and click the "messages" link in your navigation area.
Then, ensure that these messages are not hidden and that they have the message you'd like:
- Optin Teaser Message
- Optin Details

If you have text entered into these message fields and they are not hidden, they will display on your Checkout page similar to this:

Your site is now ready to send opt-ins directly to your MailChimp account. Be sure to test.
MailChimp Lists
Opt-ins from your site will be added to Mailing list in one of the following ways:
-
As a segment in your main MailChimp list
The default segment names on the opt-in forms are:- Web Optins
- Wholesale Web Optins (if wholesale is enabled on your site)
-
Directly to a list
If you would like your opt-ins to be added directly to a specific list, you will need to provide the list name to HEROweb.
Step 2: Setting Your Opt-in Messaging
Please see our instructions below for information on Adding/Updating Your Opt-In Messaging.
Integrating with Vertical Response
MightyMerchant allows you to save mailing list opt-ins directly to a Vertical Response list.
Step 1: Integrate with Vertical Response
- In your Site Manager, click "settings", then edit the Optin Provider field.
- Select "Vertical Response", then "next"
- Request an API Key
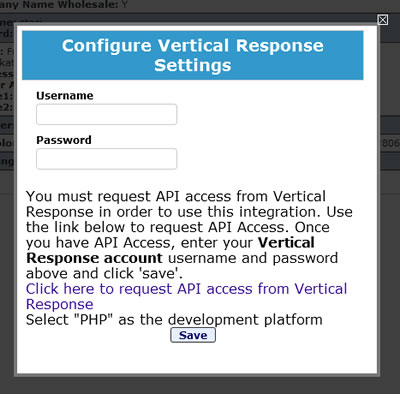
- Use the link in the configuration pop-up to request access from Vertical Response
- Register for a Mashery ID, then log in
- Fill out the request form. Be sure to enter "PHP" as the development platform.
- Enter your user name and password in the configuration pop-up, then Save
Your site is now ready to send opt-ins directly to your Vertical Response account. Be sure to test.
List Names
The default list names on the opt-in forms are:
- Web Options
- Wholesale Web Options (if wholesale is enabled on your site)
Lists with these names will be automatically created in your Vertical Response account, if they are not already created.
Step 2: Setting Your Opt-in Messaging
Please see our instructions below for information on Adding/Updating Your Opt-In Messaging.
Save to File Method
If you choose not to set up an account with one of the above email marketing providers, you can also set up mailing list submissions to save to a .csv file. You will be able to access this file via the site manager and have this data on hand should you decide to sign up with an email marketing provider in the future.
Step 1: Configure Your Site Manager Settings
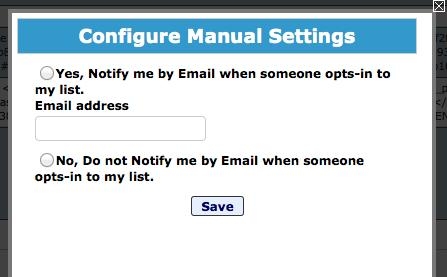
- In your Site Manager, click "settings", then edit the Optin Provider field.
- Select "Save to File", then "next."
- Choose whether or not you would like to be notified by email when someone signs up for your mailing list. If you choose the "No" option, you will still be able to access a current list of email signups via your site manager at any time.
Step 2: Contact HEROweb to Set Up Your Download Link
- Once you have configured your settings, please let HEROweb know so that we can set up your link to download mailing list signups from the site manager. You can contact us using the orange Help Beacon button at the bottom of your site manager, or by using our Online Support Request Form.
Step 3: Test Your Download Link
When we notify you that your download link is set up, please use the following steps to test:
- Submit your mailing list signup form as a test.
- If you have configured your settings so that you receive an email notification on signup, please ensure that you have received that notification.
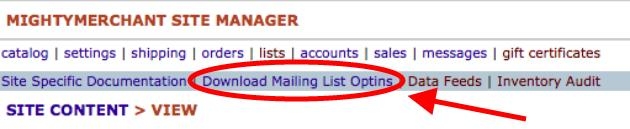
- Log into your site manager and click "catalog."
- Click the "Download Mailing List Optins" link in the blue bar at the top of your site manager. A .csv file of mailing list signups will now be downloaded to your computer.
Step 4: Setting Your Opt-in Messaging
Please see our instructions below for information on Adding/Updating Your Opt-In Messaging.
Adding/Updating Your Opt-in Messaging
Under "messages", edit the Optin Teaser Message and Optin Details fields.

The Optin Teaser Message, like "Join Our Mailing List" appears to the left of the opt-in checkbox and is optional.
The Optin Details text appears to the right of the opt-in checkbox and would contain some details of the benefits of joining. This field is required if you wish the opt-in to be available during checkout and on the contact form.
If you don't see these messages in your messages manager, please contact HEROweb using your orange Help Beacon button or by filling out our Online Support Request Form.