

First Steps
IN SITE MANAGER:
1. Navigate to the following category:
Site Content > Product Catalog > Customized Wear Shared Pricing > Cap Shared Pricing
2. Create a new customization item based on the other items in this category (*note, the first option MUST begin with a �1�)
- The �Option Text� will be what shows as the name next to the radio button in the customization modal
- Whatever you put in blurb1 will be the text that shows in the first panel in the customization modal
- The first �Note� in the options table will be the �tooltip� that shows when one hovers over the circles next to the radio buttons in the customization modal
3. Save this new item and then click Edit to view it again.
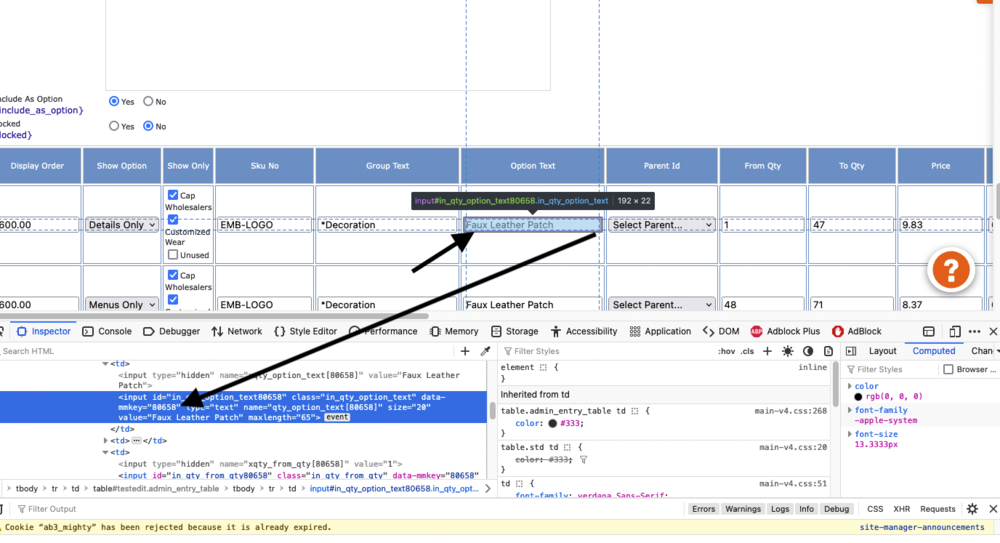
4. Using the Inspect tool, click on the first option input box with the text that holds the name of the option (i.e. Faux Leather Patch) and make note of the data-mmkey number that you see for that specific item.
5. For Locations and any images, navigate to:
Site Content > Customized Wear Site > Position Images for Decoration Forms > View
and create a new category (i.e. My New Customization Option Locations) and then add location images to that.
** Many customization options use the same location images. If yours is one of these you can just copy one of the existing Customization Location categories (make sure to make copies of the products and add them to this copy) and then edit this, changing the name and removing the words �copy� from the items.
6. Give this new category a unique Component Identifier and make note of that
ON THE SERVER:
1. You will need access to the following files and/or folders:
customizedwear/mm_content/tpl/_inserts/decoration-panels/
customizedwear/mm_content/js/DecorationModule.js
customizedwear/mm_content/tpl/products/caps/addtocart.html
2. In customizedwear/mm_content/tpl/_inserts/decoration-panels/ :
- Create a new �panel� for your new Customization Option (CO).
- Use one of the existing panels as a guide, being sure to substitute a unique name (corresponding to the new CO you just made) for all of the places where an id= is used.
- For any sections (Locations, images, colors) use an existing pattern, substituting the new Component Identifier (that corresponds to what you want to show) for the copied one
- Note: there are existing resources already in place, such as a list of colors and fonts. These can be found in the Emb_Lettering2_Panel.html
3. In customizedwear/mm_content/js/DecorationModule.js :
- Use the existing pattern in the var formTargets ={} object to create a new sub-object (i.e. one of these:
5:{
id: 5,
panelList: ["#Emb_Logo1_Panel"],
imageUploads: 1
},
- Use the noted mm-datakey id number from your new CO as the name and id in this new object
- For the panelList: value, use the name of the new panel you just made (following the existing pattern)
- Instead of adding multiple panel groups to your main panel, you can re-use decoration panels by listing them, like this:
panelList: ['#Emb_Lettering1_Panel', '#Emb_Lettering2_Panel'],
In the customizedwear/mm_content/tpl/products/caps/addtocart.html file :
- Find the list of inserted files under
- Using the existing pattern, copy one of these, substituting the name of your new Panel file name for the copied file