

Site Manager Basics
You have several basic controls for getting around and using the Site Manager. Each of these sections will be explained in further detail later in this document.
Site Manager Modules
Your Site Manager includes a number of links that take you to difference modules within the Site Manager.

The "catalog" or "site content" links brings you to the main Site Manager page where you will access your Main Categories.
Use these links for more information on other modules of the Site Manager
- Global settings and messaging: "settings" and "messages"
- Shipping Manager: "shipping"
- Order Manager: "orders" and "lists"
- Related Items Manager: "groups"
- Accounts Manager: "accounts"
- Sales Manager: "sales"
- Gift Certificates Manager: "gift certificates"
Accessing Categories and Items
Search Functions
If you have a large number of products, you may find it easier to search for a particular product with one of these methods:
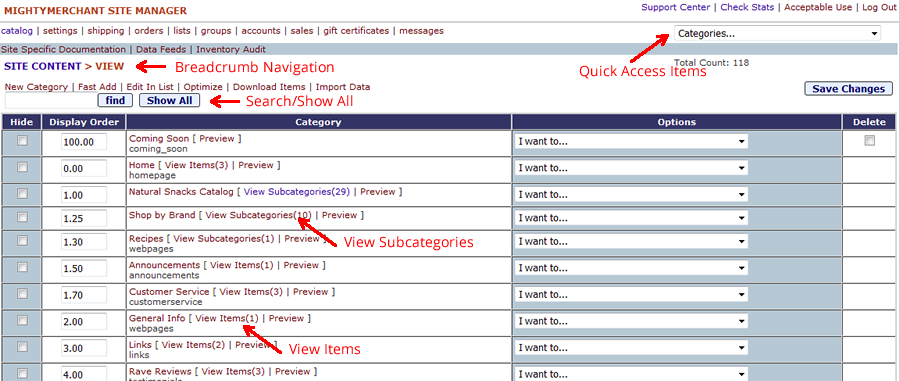
- Use the drop-down "Categories" menu located in the top right corner of the Site Manager to quickly view items within categories or subcategories.
-
Search for a particular item using the "Find" search field. To search, you can enter a Item Name or Item ID/SKU number. A list of matching items will be displayed and you can click the one you want to edit.
- When viewing a list of items, click the "Show All" button to view a list of all items.
Breadcrumb
- When you are navigating within the main area of the Site Manager ("catalog" or "site content"), you can use the breadcrumb navigation. This navigation changes depending on where you are within the organization of your Main Categories.
View Categories, Subcategories, and Items
- Click the [View Items] or [View Subcategories] links to the right of any Category.
- To quickly view items in Subcategories, use the "Quick Access Items" menu at the top-right of the screen.
- To view your Main Categories, click "catalog" in the Manager Section Links, or "Site Content" in the breadcrumb navigation.
Managing Content
The main organizational unit of your site is the Category. Categories (and Subcategories) are the "containers" for all your items. When you log into the Site Manager you will see your list of Top Level Categories.
Your Site Manager offers a variety of options for managing site content.

Content Action Links
- "New Category" link: Add a single category to the Top Level Categories.
- "New Item" link: From a list of items, add a new Item to the list.
- "Fast Add" link: Add multiple Categories or Items at once (all fields may not be available)
- "Edit in List" link: Make the fields in a list of Categories or Items editable from the list view.
- "Optimize" link: Quickly edit the search engine optimization fields for Categories or Items.
- "Download Items" link: Download Item information to a file.
- "Upload Data" link: Upload Categories or Items with a pre-formatted file.
"I want to" Drop-Down Menu
- This menu allows you do a number of tasks associated with Category content.
Saving Changes
- Any time you make changes in the Site Manager, you will need to save your changes in order for them to take affect. There will normally be a "Save Changes" or "Save" button at the top and/or bottom of the screen.
- Clearing the Cache: The pages of your website are cached to decrease the time it takes for each page to load. When you save changes in your Site Manager, the cache is updated. To manually update the cache, click the "Admin Panel" link, then click the "Clear Cache" link.
See more on Managing Categories and Managing Items
Getting Support for Your Site Manager

- Use the "Site Specific Documentation" link for information on how your site is set up.
- Access the MightyMerchant Support Center by clicking the "Support Center" link at the top-right of the screen.
- If you can't find your answer in the Site Specific Documentation or in the Support Center, click the question mark in the blue circle from the page you need help with. This prompts you to send a support request to the HEROweb support staff.