

Manage Items
Overview
The Add/Edit Item pages allow you to specify many characteristics about your products. Most of the fields on the page are not mandatory. Product/Item field names will be different depending upon which category or subcategory you are adding to, but the basic process is the same throughout.
To have a file available for download on your site, you effectively need to accomplish two tasks.
1. Loading the file onto your your website or making sure it is available from some other website.
2. Putting a link in one of your webpages to the file you have uploaded.
There are range of ways to accomplish this goal and the complexity of the solution that you need, depends on how sophisticated you need your file download area on your site to be.
Below are some simple instructions.
Adding a New Product
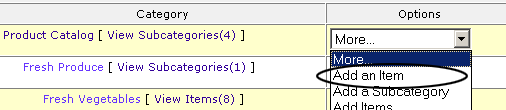
To add a new product from a Category or Subcategory list page:
- 1. Decide which category you would like to have your product in and choose "Add an Item" or "Fast Add Items" from the Options drop-down menu next to the category name.
2. Enter all relevant information for your product. Everything on the page is optional, although, at the very least, you will want to enter a Product Name (and a Price for products that are for sale).
3. Click "Save Changes".
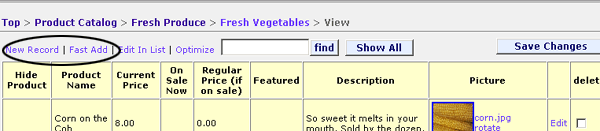
To add a new product from a Product List page:
- 1. Click "New Item" to add a single item or "Fast Add" to add several products.
2. Enter all relevant information for your product.
3. Click "Save Changes".
Adding Multiple Items at One Time
To add a new product from a Product List page:
- 1. Click "New Item" to add a single item or "Fast Add" to add several products.
2. Enter all relevant information for your product.
3. Click "Save Changes".
Editing Products/Items
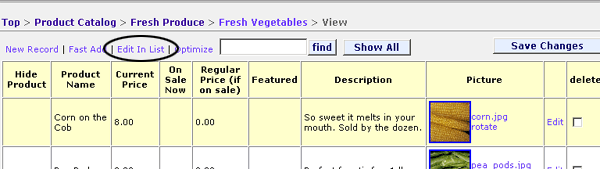
To edit products/items:
- 1. Click on "View Items" in the category where the product resides. (You can also use the categories menu or "Find" search field.)

2. To edit one item in the product list, click the "Edit" link for that product. You will see all product fields for that one product.

3. To edit all items in the product list, click the "Edit in List" link. The product list fields will become editable and you will be able to make edits to multiple products at one time.
4. Click "Save Changes".
5. To return to the non-editable product list, click "View List" which will be in the same spot where you clicked "Edit in List".
Deleting Items and Categories
Any product or category can be deleted from the Site Manager database. If you might want to use the product or category in the future, you should hide it rather than delete it.
To delete a product or category:
- 1. View the page in the Site Manager that contains the list of products or (sub)categories you wish to delete.
2. Click the "Delete" checkbox in the right column for each entry you would like to delete.
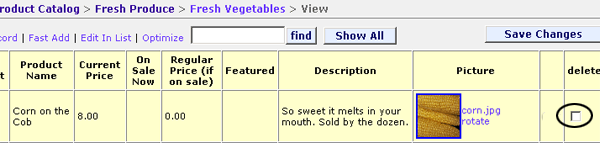
3. Click "Save Changes".
4. You will be prompted to confirm your changes. Be sure you would like to delete these items as the Delete function is not reversible.
Note: If you delete a category, the items inside that category will not be deleted from the database. However, you might need to re-assign them to another category to get them to appear on the site. It's best to reassign the products by changing the Main Category on each item's edit page before deleting the category.
Hiding Items and Categories
The "Hide" feature allows you to suppress a product or category from showing up on your site without actually deleting it from the Site Manager database. This is a handy feature if you are out of stock on a certain item or have a seasonal announcement that you might want to remove from the site but run again.
Note: If you hide a category, the products within that category will not show on your website; however, these products may still be indexed by search engines resulting in a link to that product page. If you do not want products within a hidden category to be indexed by search engines, you will need to hide the products as well as the category.
Reminder: The following Top Level Categories are checked as hidden: Announcements and More Info, and possibly the Product Catalog. This does not mean the information in these categories is hidden. You will want to leave the "Hide" box for these top-level categories checked.
To hide a product or category:
- 1. View the page in the Site Manager that contains the list of products or (sub)categories you wish to hide.
2. Click the "Hide" checkbox in the far left column for each entry you would like to hide.
3. Click "Save Changes".
The entries you selected will be hidden from the site.
Adding/Editing Products in the Products Catalog
General instructions for adding/editing items can be found in Adding a New Product. Below are the fields that may be available for your items/products, depending on the needs of your website. Most fields are self explanatory. Most fields are not mandatory.
Product Fields
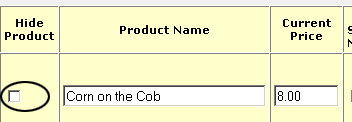
- Hide Product: Hiding a product prevents it from being displayed on the website.
Display Order or List Order: Determines in which order products will be displayed. Decimal numbers may be used; for instance, a product with a display order of 1.20 will show before a product with a display order of 1.30. All products with a display order of 0.00 will be listed first and in alphabetical order.
Product Name: It's a good idea to name your products with descriptive keywords in mind. For example, if you're selling clothes, people are more likely to do a search for "Red Embroidered Sweater" than "The Carlisle".
Current Price: The price the product is currently selling for.
On Sale Now: Check if a product is on sale. "Sale" text will display next to the product.
Regular Price: Fill in this field only if a product is on sale. On the website, your products will show the sale price, along with the current price with a line through it.
Featured: "Featured" text will show next to the product if this box is checked.
Weight: Used for calculating weight-based shipping. Enter amount as a decimal. For example, 1.5 equals one and a half pounds.
Free Shipping: Choose yes to turn on free shipping for this item.
Shipping Charge: Use this field for any additional shipping charge for the item that needs to be added to the standard shipping charges.
Description: Use keywords in your product descriptions. Keep in mind that online shoppers want lots of information since they can't see the item directly.
Image 1: Upload a product image. See Uploading Images.
Image 2 (optional): Upload an optional second image.
Options Menu1: Use this field for product options that do not affect the price of a product. Option choices will appear with the product on the website.
Options Menu2: Use for an additional options drop-down menu.
Main Category: This is the category or subcategory that contains this product.
Check which categories you would like this item to appear in (located to the right of the main fields): Check off any other category or subcategory where you want this product to show.
Note: You only want to choose additional categories that would be logical for a particular item. For example, you should not list a product for sale in the "Links" category.
Product ID/SKU: The number you use in your own inventory system to describe the product.
Wholesale Price: For wholesale sites only.
Shipping Charge: This charge is added to the shipping total.
Additional Description
Qty on Hand: For sites with inventory control
Price Options Grid: for use with options and quantities that affect the price of a product.
Multiples: (only works with default layout) the value added to this field will force users to add a minimum amount to cart
There may be additional fields set up depending on your website features.
Duplicate a ProductSteps to Duplicate an Item in the Site Manager
1. From a list of items, click "Duplicate" to the left of the item you want to duplicate.

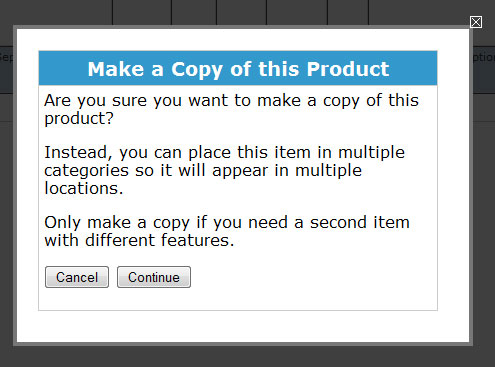
3. The duplicate will have "copy" appended to the item name. Be sure to remove "copy" and adjust any other content as needed.
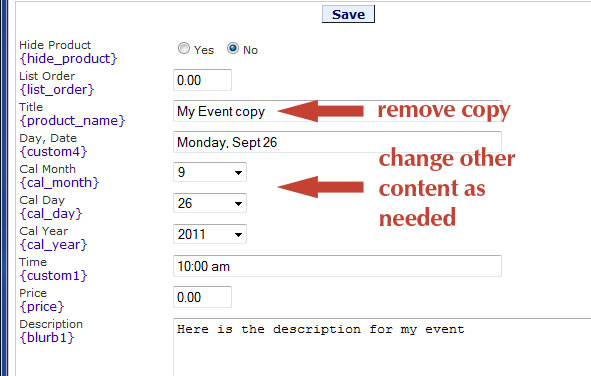
4. Save your changes.
Adding/Editing "More Info" Articles
We use the term "Article" to describe any web page that contains a large block of text and images. You might use this Main Category to create News pages or basic informational web pages, such as privacy policies or shipping information. Because articles tend to have a lot of text in them it is often easier to add one at a time.
Click here for general instructions on adding/editing items.
"More Info" articles items normally use the fields listed below.
- Hide
Display Order
Page Name or Title
Page Text: The main text of your article.
Image 1: The default position for the More Articles pages is the upper right corner of the text.
Adding/Editing FAQs
Click here for general instructions for adding/editing items. "FAQ" items will use the fields listed below. Most fields are self explanatory.
FAQ Field Descriptions
- Hide
List Order: the order in which the questions are displayed.
Question
Answer
Adding/Editing Links
Links can be added through your Site Manager just like any other item. Links may also be submitted by visitors to your website using the form available on your Links web page. When someone submits a link, it will be stored in your Site Manager as a hidden item. You will receive an email with a link to that item in your Site Manager.
You will want to review the link submission, then unhide the item if you wish it to be shown on your Links page.
When a site visitor clicks a link on your Links page, the link will automatically open in a new window so your customers will still have your site window open in the background.
Click here for our support section on adding/editing items. "Links" items will use the fields listed below.
Links Field Descriptions
- Hide Link
Website Name
Link to Site: This is the URL of the linked site.
About the Site: A description of the linked site.
Logo: Optional image to show with the link information.
Incoming Link Location: If someone submits a link to your site, this is the URL of the page on their website that contains a link to your website. This is called a reciprocal link.
Submitters Name: The name of the person submitting a link for review.
Submitters Email Address
Adding/Editing Announcements
Rave Reviews are set up so that your customers can submit a testimonial. You are notified by email when a testimonial is received so that you may review it before it is posted on the site.
Click here for general instructions for adding/editing items. "Rave Reviews" items will use the fields listed below.
Rave Reviews Field Descriptions
- 1. Hide
2. List Order
3. Teaser Title: a short description of the testimonial.
4. Testimonial Text
5. Customer Name
6. Submitter's Email Address: this field will be filled in if a visitor to your site submits a testimonial. You can reply to this email address to reply to the submitter. This email address will not be posted on your site.
Adding/Editing Rave Reviews
Rave Reviews are set up so that your customers can submit a testimonial. You are notified by email when a testimonial is received so that you may review it before it is posted on the site.
Click here for general instructions for adding/editing items. "Rave Reviews" items will use the fields listed below.
Rave Reviews Field Descriptions
- 1. Hide
2. List Order
3. Teaser Title: a short description of the testimonial.
4. Testimonial Text
5. Customer Name
6. Submitter's Email Address: this field will be filled in if a visitor to your site submits a testimonial. You can reply to this email address to reply to the submitter. This email address will not be posted on your site.
Adding a Simple Newsletter
Adding a Simple Newsletter
If you need a simple, single-page newsletter, this is easily accomplished by adding an item called, for example, "Newsletter" through the "More Info" Top-Level Category.
Tip: If you want to post a short newsletter a on a regular basis, but don't want to lose the information contained in previous issues, you can create a new page for each issue, then hide the issues that are not current. You'll want to name each issue differently, like "Spring Newsletter" or "March Newsletter," etc.
Adding a Multi-Issue Newsletter
To add a multi-issue newsletter that contains multiple articles per issue:
- 1. Create a new Top-Level Category named appropriately for your newsletter.
When creating this new category, you MUST set the Template Set drop-down to "webpages." You can add a description of your newsletter if you like. Click "Save all Changes".
2. Create subcategories for each issue of the newsletter under your Newsletter category.
3. Add articles as items to the appropriate issue subcategory.