

Google: Google Analytics Funnels and Goals
Setting Up a Session Filter
Note: all eCommerce customers should enable this setting, even if they will not be using Funnels and Goals.
1. Click "Analytics Settings" and on the next screen, click "Filter Manager".
2. Click "Add Filter".
3. Enter these settings:
- Filter name: Session
- Filter type: Custom filter
- Click the Search and Replace radio button
- Filter Field: Request URI
- Search String: /home/mm5_[0-9]+/ (replace "mm5" with your store id)
- Replace String: /home/mm5/ (once again, replace "mm5" with your store id)
- Case Sensitive: click No.
4. Click Save Changes.
Setting Up an IP Exclusion Filter
MightyMerchant recommends that you set up two IP Exclusion Filters to indicate the IP addresses that MightyMerchant uses. We often visit our client websites to assist with site updates, evaluation of features and troubleshooting. Because of this the tracking data generated by Google can be skewed if these IPs are not excluded from the reports.
1. Click "Analytics Settings" and on the next screen, click "Filter Manager".
2. Click "Add Filter".
3. Enter these settings:
- Filter name: MightyMerchant Office 1
- Filter type: Exclude all traffic from an IP address
-
Enter the IP Address in the following format
75.150.43.137
Click Finish. Repeat the process for the second filter below:
- Filter name: MightyMerchant Office 2
- Filter type: Exclude all traffic from an IP address
-
Enter the IP Address in the following format
63.224.195.19
When finished check your Filter Manager. You should see something similar to the image below.

Setting Up Your Funnels and Goals
1. Log into your Analytics Account.
2. Click the Admin link.
3. Click the Profile you would like to Edit.
4. Click the Goals tab.
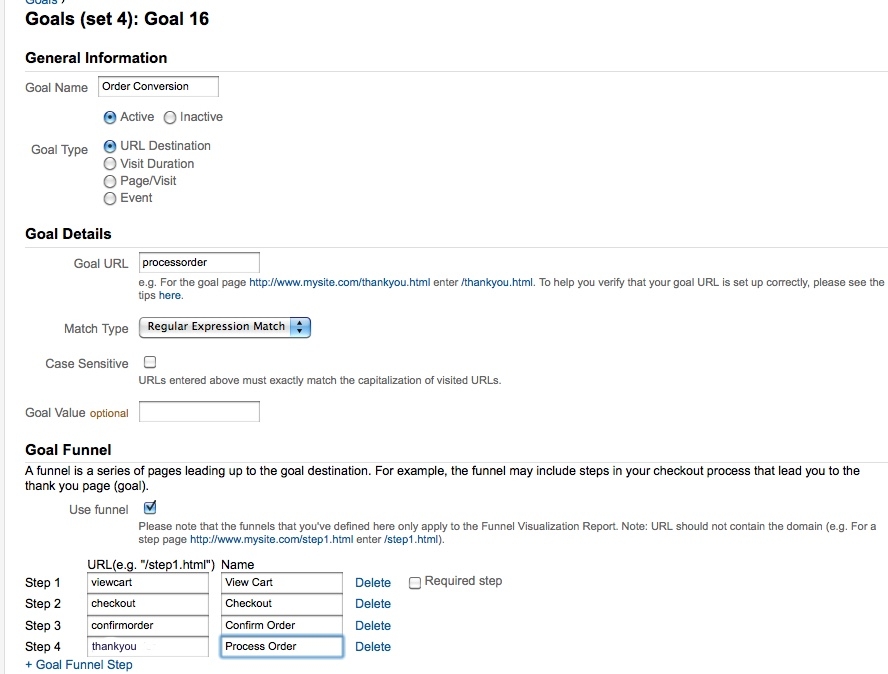
You have multiple conversion goals you can utilize for each website profile. You can customize the goals and funnels any way you wish. Typically you would track the steps in the checkout process. Or, you might want to track the activity from a particular page on your site to determine how often users continue through from that page to place an order. To track order conversion on your site, you can set up a goal as follows:
Checking Your Funnel/Goal Statistics.
Google Analytics data is typically updated every 24 hours. To check your Funnels and Goals:
1. Click View Reports.
2. Select Marketer from the View menu.
3. Click Defined Funnel Navigation
4. Select Executive from the View menu.
5. Click Conversion Summary.
Setting Up Google AdWords Conversion Tracking.
- Login to your Google AdWords account.
- From the Google AdWords account main page, select the Conversion Tracking link.
- Click Create a New Action.
- Name it, choose the type of action (Purchase, Sign up, Lead, Page View, etc), and an optional value of the action. (NOTE: This dollar figure is purely for reporting purposes and of limited value.)
- Describe where the action is completed. Choose either http or https as appropriate. Most purchase confirmations will be on the secure server, https.
- Click Save Action & Get Code.
- Click inside the code box and use Control A to select all. Important! Make sure you get the complete code! It should end with a tag!
- Go to your site's Myadmin panel, and click the settings link.
- Copy the code into your site's Ad Tracking HTML box at the bottom of the settings page.
- Click Save.
- Go back to the Google AdWords Conversion Tracking screen.(Refresh the page, if you are still there from before.)
- Under status, you should see a link to Verify Code. Click it.
-
In the box where it asks for a URL, enter the page URL to your Order confirmation page (Thank you page).
http://www.--yourdomain--.com/home/--storeid--/thankyou
Replace --yourdomain-- with your domain name and --storeid-- with your storeid.
Hit the Verify link.
- If everything went correctly, you will see a successful confirmation. If it fails to verify, first check to see that the complete code is in place in the Myadmin settings panel. If the code is complete and correct, and it still doesn't verify, contact your MightyMerchant support representative for troubleshooting.